Friday, November 6, 2015

Friday, October 30, 2015
Extract Deltas
the site says it best, "extractDeltas is a plug-in for Maya which helps with the creation of corrective blend shapes to improve the overall deformation in conjunction with regular skinning.
It allows to model the corrective shape based on the deformed pose of a character and then generates a mesh which can be used as a blend shape target before the skin cluster calculation is performed."
you can get this here: http://www.braverabbit.de/extractdeltas/
Thursday, September 17, 2015
Xibulba Rig
I saw this really quick but nice breakdown of the Xibulba rig from Blue Sky's The Book of Life. Inspirational work!
VES Submission Breakdown Book Of Life - Xibalba from Daniel McCrummen on Vimeo.
Sunday, September 13, 2015
Touch based controllers
This was shared via a workshop i am taking and thought it was worth sharing myself here.
Wednesday, June 10, 2015
Wednesday, May 6, 2015
Thursday, April 16, 2015
Tuesday, April 14, 2015
Thursday, April 2, 2015
Wednesday, April 1, 2015
Tuesday, November 13, 2012
BACK ALL FK RIG
Here is how to do a controller to control the rotations of multiple controllers on an FK Spine.
First draw at least 3 joints from the root of your character (assuming a humanoid). Label the joints Spine_1, Spine_2, and Spine_3; make sure that you use a script such as cometJointOrient.mel from comet cartoons:
http://www.comet-cartoons.com/melscript.php
X axis should be pointed down the heirarchy and the Z rotation axis should match on these joints. See figure:

create 3 NURBS controllers for these joints (I use circles); then create 3 nulls by going to create>empty group or by hitting Cntrl +G with no objects selected.


First draw at least 3 joints from the root of your character (assuming a humanoid). Label the joints Spine_1, Spine_2, and Spine_3; make sure that you use a script such as cometJointOrient.mel from comet cartoons:
http://www.comet-cartoons.com/melscript.php
X axis should be pointed down the heirarchy and the Z rotation axis should match on these joints. See figure:

create 3 NURBS controllers for these joints (I use circles); then create 3 nulls by going to create>empty group or by hitting Cntrl +G with no objects selected.

you will then select Spine_1 joint and then a null and go to contrain>parent (make sure that maintain offset us UNCHECKED in the options). Repeat this for each null and then delete these constraints by selecting them in Window>hypergraph:hierarchy .

move the NURBS controllers to the joint they will control (hold V to snap to a joint); now freeze transformations on your NURBS controllers then parent them P by selecting the controller and then the null associated with the joint they will control. select the NURBS controller and then freeze transformations on them again.
Select a controller and hit control-G to make a group between it and its null. Repeate for each controller and name them BACK_A_GRP, BACK_B_GRP, and BACK_C_GRP.

Select each Spine controller then the joint it controls and do a constraint>Parent Constraint for each one.
Awesome; now you will create or choose a NURBS shape to work as your BACK_ALL_CNTRL. I usually take a larger circle or other shape from a library of controllers I have. Create a null; select the Spine_2 joint and then the null and do contrain>Parent Constraint. Delete the constraint. Now freeze trasnformations on BACK_ALL_CNTRL and then parent (hotkey is P, NOT the same as parent Constraint). to the null. Freeze transformations on the controller again.
Now select BACK_ALL_CNTRL and BACK_A_GRP , BACK_B_GRP, and BACK_C_GRP and go to window>Rendering Editors> Hypershade.

Now you will hit the graph input and output connections and in the work area selec the little output arrow from BACK_ALL_CNTRL and select rotate> and then connect the green connector to the input arrow of the BACK_A_GRP and choose rotate. Repeate this between the BACK_ALL_CNTRL and each back group.

You are now done; if all is right in the world you now can control your spine controllers individually or all at once with the SPINE_ALL_CNTRL. Well done!
Wednesday, November 7, 2012
Reverse Foot Rig, Part 2
It's been a while since I have updated....so forgive the absence. I have been one busy gal. If you have found the tutorial helpful or it needs some clarifying on any step, just let me know!
The rest of the reverse foot rig is pretty easy stuff. You have done all the hard work up til this point. Give yourself a pat on the back. Go ahead! You deserve it!
Okay, now back to work.... you can't go patting yourself on the back all day.
As you remember last time we had a heirarchy now set up for the reverse foot. I will usually just go ahead and grab that in the hypergraph and parent it to the rig_ALL_CNTRL ; this is the controller that should be at the top of your heirarchy of controllers.


The rest of the reverse foot rig is pretty easy stuff. You have done all the hard work up til this point. Give yourself a pat on the back. Go ahead! You deserve it!
Okay, now back to work.... you can't go patting yourself on the back all day.
As you remember last time we had a heirarchy now set up for the reverse foot. I will usually just go ahead and grab that in the hypergraph and parent it to the rig_ALL_CNTRL ; this is the controller that should be at the top of your heirarchy of controllers.

Once you do that we are going to create TWO groups in this hierarchy. This will be to control the banking of our foot from side to side.

repeat this for the other foot!
Now we are going to do some set driven keys to automate a few of these processes. Stand by in part three!
Thursday, May 24, 2012
Reverse Foot Rig Part 1
Hey guys and gals; so this is the reverse rig set up for Maya; I am using 2011 but it should work with previous or later versions (I have done this in 8.5, 2008, 2009, 2010, and 2012 Maya versions). The reverse foot is a rig that exists outside the joint heirarchy of the skinned joints to help control an IK leg.


To do this we create joints at the heel of the characters foot and flow to the toe, mid foot, and ankle.


You will need the joint orientations of these to match; in the case of my reverse foot here I will make the Z all be the primary rotations and all point the same direction. I will suggest the cometJointOrient melscript at comet-cartoons (http://www.comet-cartoons.com/melscript.php) . If you want to follow along with me, here is my joint orientation shown.

You will want IK handles (using the RPsolver) to stretch from the characters hip to ankle. Then ankle to foot and foot to toe_dummy. Just like in the image here:

place the reverse foot rig (R_heel should be the root) in the foot. Then starting at Reverse_Toe; select the joint then shift select the IK handle near it (the one that goes from foot to toe_DUMMY) and use constraint>parent contraint with maintain offset checked. Repeat this step by selected Reverse_Foot joint and the IK handle that goes from ankle to foot. parent constrain again. Then select the Reverse_Ankle and the IK handle that goes from hip to ankle. Once again use parent constraint. See the illustration to see these connections and relationships:

I will usually now group all my IK handles and call them something like R_IK_GROUP (L is for Left or use R for Right). I will also select my reverse Heel joint and group it and call it R_REV_FOOT_GRP. I will then parent my R_IK_GROUP to my R_REV_FOOT_GRP and in turn parent the R_REV_FOOT_GRP to the NURBS controller called R_FOOT_CNTRL. The heirarchy will look like this:

next tutorial we will add banking and foot roll and really show what the reverse foot is full capable of!
Monday, January 23, 2012
Video!
Video is available for the bring in an animated mesh from Maya to UDK; take a gander and don't forget there is a pdf on the previous entry!
http://youtu.be/rm0YIrygiY0
Tuesday, January 17, 2012
bringing animation from Maya into UDK / Unreal
I can't seem to find the part with the exporter; but this part is once you have exported the .psk and .psa files from Maya
just an additional fyi, the max number of mesh influencing bones in a skeleton is 75, the max number of total bones in a skeleton is 256 and you can set an influence limit of 4 joints per vertex.
Thursday, October 13, 2011
Jayna Pavlin’s Very Derivative Clavicle Set Up
Create a curve controller for the clavicle
Freeze Transformations on it after placing it
Parent it to the null
Unparent your arm rig from the rest of your character heirarchy.
Create a group above your arm rig (not including the clavicle) and move its pivot to the shoulder, call it something like L_ARM_RIG_ALL.
Note: this will not be under a null, but should instead be the parent of the null over your upper arm controller.ull and freeze transformations again

Create a locator and name it L_CLAVICLE_DUMMY
Move the locator to the clavicle joint L_Clavicle_Dummy

Parent the L_ARM_RIG_ALL group under the L_Clavicle_Dummy

Select the clavicle controller and then the clavicle joint and Constrain>Parent Constrain
Select the clavicle joint and then the Clavicle Dummy and Constrain>Parent Constrain (maintain offset)
Select the L_ARM_RIG_ALL group and the L_Clavicle_Dummy and in hypershade select the graph input/output nodes
Select a mult/divide node from general utilities (left side of the hypershade)

Select rotation out of the L_Clavicle_Dummy to input1 of the mult/divide node
Select the output of the mult/divide node into the rotation of the L_ARM_RIG_ALL
On the L_Arm_Controller (or equivalent) create an attribute called Inherits_Rotate_Off and set it to go from 0 to 10 with the default being 0
Create a set driven key with that L_Arm_Controller’s Inherits_Rotate_Off attribute driving the multiply/divide nodes Input 2X, 2Y, and 2Z attributes. When Inherit_Rotates off is at 0, the multiply divide notes Inputs should be set to 1, when Inherits_Rotate is at 10, it should be at -1
Parent the L_Clavicle_Dummy to your top spine controller not under the L_Clavicle_cntrl
if it spins out, cntrl-Z to undo, then group it under a group called L_CLavicle_Group
create a null; select the top spine join and then the null and do a parent-constraint with maintain offset left unchecked
delete the constraint
parent the L_Clavicle_Group under the null
select the null then shift select the spine controller and parent (P)
then select the null of the clavicle controller and shift select the spine controller and hit P to parent it into the heirarchy. it is part of the spine heirarchy and not at the top of the arm heirarchy of null/controllers.
Tuesday, October 11, 2011
Pole Vector Set Up
Now, its pretty easy to set up a basic pole vector controller; just select the controller and then the IK handle. The problem is if you move the leg about you might have to counter-animate. If you want to make sure it follows your foot controller and IK handle this is a handy and quick way to make it happen!
select knee controller then IK handle and constrain>pole vector
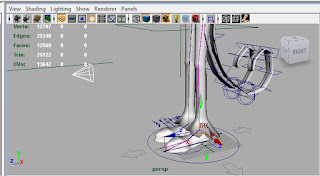
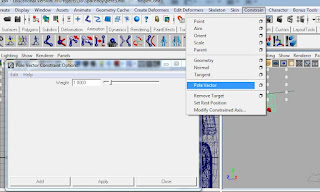
put knee controller under a group (cntrl+g)
center pivot on group
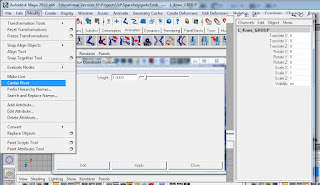
Select IK hip joint, foot controller, and lastly the knee group (group above the pole vector control)

Constrain>point constraint
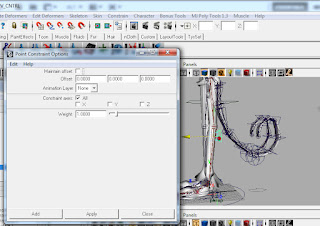
the controller popping behind the knee is normal, don't worry about it!

select IK hip joint, shift select knee group (the group above your pole vector controller)
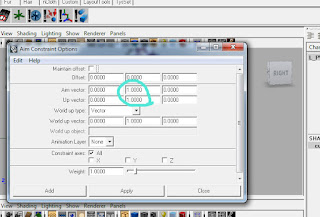
constrain>aim constraint
aim vector is Y = 1, up vector y=1 as well (default)
select the curve contoller (not group) for the pole vector knee and move forward
freeze transforms on it
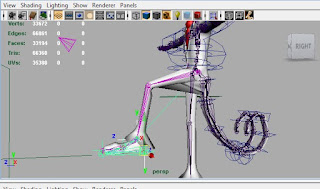
now you can adjust the foot controller and your polevector controller will follow!
Thursday, October 6, 2011


Subscribe to:
Posts (Atom)